Yes, it is recommended to oil the lower bearing system and the upper bearing every 3 months for daily use.
Machine oil or spray grease for bearings is the best way to moisturise.
The rubber surfaces on the lower and upper disc are not gripping the floor/ceiling because I am constantly moving my Classic bar up and down. What can I do?
Clean the rubber surfaces of the discs every time before installation. Use pure alcohol for regular cleaning and Nitro Thinner 900 to freshen up the surface and make it even stickier.
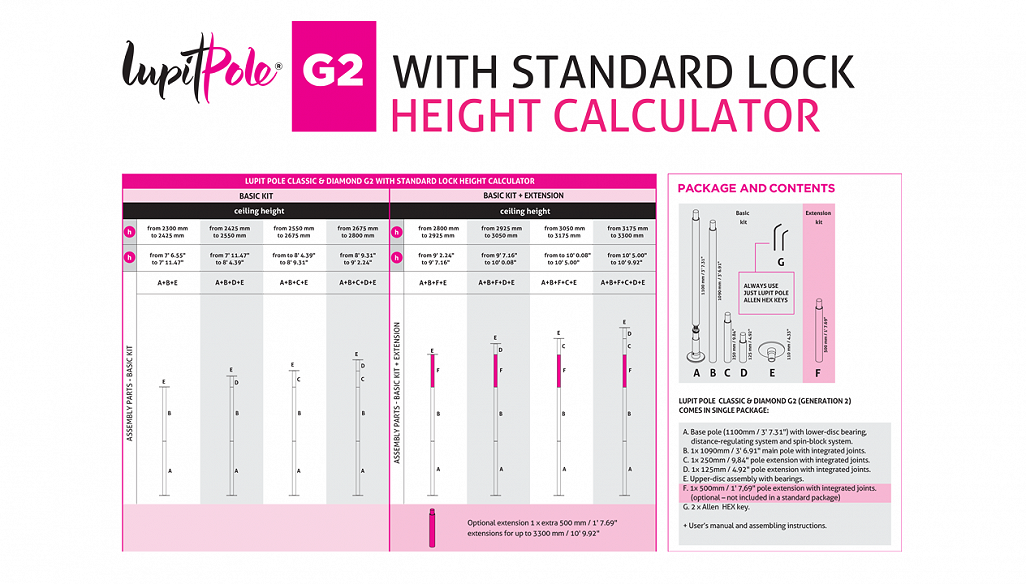
Lupit Home Classic G2 basic kit can be used up to 2800mm, but with a 500 mm extension, it can go up to 3300 mm.


The maximum weight of the dancer dancing on the pole cannot be calculated or recommended. It is important to understand that the real limitation is the lateral force generated by the dancer.
For example, a very thin and light dancer may spin very fast and generate quite a large centrifugal force, which may be equal to or greater than the force generated by a heavy dancer with slow and smooth movements. The lateral force generated may also be due to the different heights of the bar placed between different floor coverings and different ceilings.
There are too many variables to consider to calculate the correct braking force.
Lupit Pole Classic poles have no braking records so far.
Only the best materials are used and mechanical engineers using the latest design tools and knowledge have done the mechanical design.
Usually, the pole is just overtightened. Follow the instructions and tighten the pole by hand. Then hold the pole A while you secure the bottom nut of the pole against the top nut with the wrench. So, first, tighten the pole and tighten part A just enough to secure the pole, and then tighten the lower nut very tight against the upper nut. First, you need to hold the top tube of part A by hand and tighten the "bottom nut" with the tool, and then in the last phase use the second tool to hold the top nut.
The rod should now be stable and secure.
If the pole is not vertical, it is possible that the force on a bearing system is not evenly distributed, which can create additional resistance. To bring the mast to a vertical position, use a water leveller.
The bearings are dirty or dry. You must lubricate the lower bearing system and the upper bearing every 3 months with daily use. Machine oil or grease for the bearings in a spray can is the best way to lubricate. Follow the video instruction here.
It is normal. If it is a little uneven it is normal because of the design of the system, used to block the thread of the pole. As long as the pole spins right, it is Ok.
The pole needs to be slightly tightened. The extra pressure on the joints will create sufficient friction to block the joints.
We do not recommend the installation on plaster or other fake ceilings. The best is to install the pole on concrete or hard wooden ceilings. It is important that the ceiling or flooring is not fragile, too soft or too flexible because the pressure between the ceiling and floor must remain sufficient in order to ensure safety.
If there is no other option than to install the pole on the plaster ceiling we can recommend two ways to do it:
- the first is to reinforce the ceiling from the inside. The plaster (false) ceiling must be opened and reinforced by an expert. Some support elements must be used to reinforce the surface area where the pole is about to be installed. Usually, it is done by using wooden beams and plywood.
- the second option is only to be used if the false ceiling is already well supported but the plaster would not withstand the pressure of the upper pole. So the 25mm ( 1 inch ) thick and the size of 1m x 1m plywood should be mounted to the ceiling making sure it is screwed through the plaster directly to the construction elements.
In both cases, the ceiling after it is reinforced must withstand a vertical up-force equal to about 120 kg.
Yes but you need to use the LP Classic Slope Ceiling Mount which must be fixed to the ceiling.
The spin/static screw was not aligned with the mark on the disc at blocking the spin. The axel got damaged. Contact Lupit.
If you have any questions please contact our support center.
The Hex-key (Allen key) is damaged and needs to be replaced.
The spin/static screw is damaged. It must be removed and replaced.
The hex key is damaged. Use a new 4mm hex key.
Remove the screw using special tool “screw extractor” like this: HTTPS://WWW.AMAZON.COM/DAMAGED-SCREW-REMOVER-EXTRACTOR-EASYOUT/DP/B07HGSPQDV
Change the extracted screw with a new one.
The pole creates an 80 – 120 kg load.
The upper disc has a 200 mm in diameter.
The lower disc has a 120 mm in diameter.
Yes, you can:
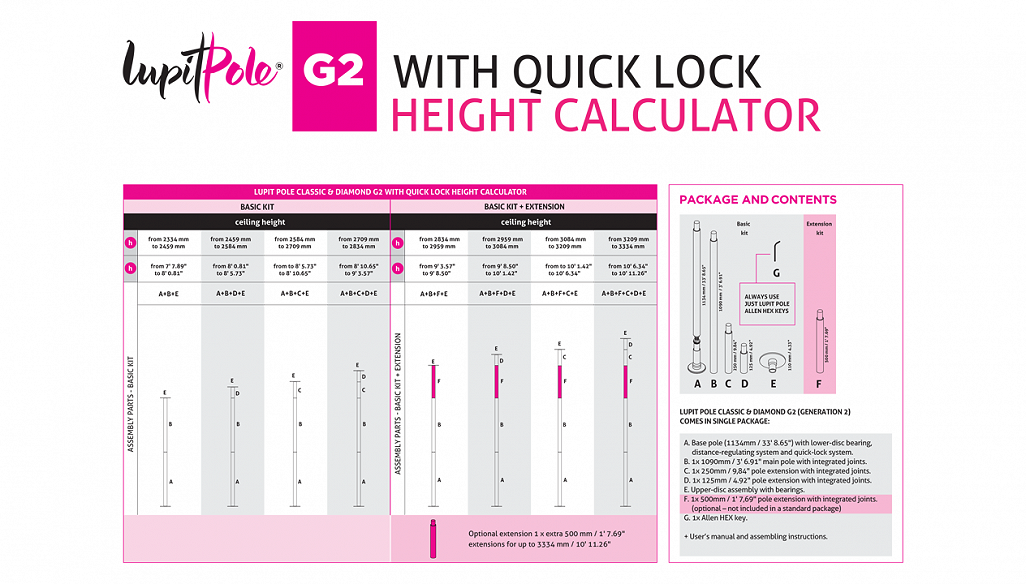
The standard pole setup included in the package is for ceiling heights between 2300 mm and 2800 mm.
To go higher than 2800 mm you need to purchase a 500 mm extension.
To go lower than 2300 mm you need to purchase extensions according to this table: In your case, you need to purchase two 500 mm extensions.
LP Classic G2 (Generation 2) is upgraded LP classic
Improved SPIN, as a consequence of improved joint system and upgraded bearing systems
INCREASED STABILITY: fewer extensions for the same height & increased max. height from 3200 mm to 3300 mm.
EASIER INSTALLATION & SAFER THREAD LOCK: changing technology for thread block, without impractical and large key tools, and hard tightening of the locking nuts.
SMOOTHER DESIGN: the cover fits the lower part - no more gap, the cover does not get unscrewed during the exercise
The new lower bearing system with new technology for thread locking. Complete part A must be replaced. It will increase spin and safety and make an easier installation.
The difference between classic and diamond is minimal but essential.
Proper installation is an essential part of the safety measures.
Lupit has a wide range of portable poles.
The pole is designed to be installed by a single person in just a few minutes without drilling. The high-quality surface, the unique flex system of the upper disc, and the NEW Safety Block groove ensure a faster installation and maximum safety for the dancer.
For ceilings higher than 2800mm/9'2.24'', check out our extension in the related products and extend your pole up to 3300mm/10'9.92''.
Thank you for your message.
We will get back yo you shortly.
